In this Blog we will set up ESLint on Visual Studio Code. We can also configure ESLint to automatically fix syntax errors when you save your files.
Prerequisites
You will need the following:
• The latest version of Visual Studio Code installed on your machine.
• The latest version of Node installed on your machine. You can accomplish this by following the How to Install Node.js and Create a Local Development Environment for your machine.
Step 1:
Run the following command:
npm init –yes
Using the npm init command to initialize your project will create a package.json file in the vscode-eslint-example directory. The package.json will store your project dependencies and other important configuration settings for your project.
Step 2:
Setting Up ESLint:
npm install eslint –save-dev
It’s important to include the –save-dev flag because this saves the package as a dependency for development usage only. In this case, eslint is a package that is only needed when you are actively working on and making changes to your project. Once your project launches or is in production, eslint will no longer be needed. Using the –save-dev flag ensures that eslint will be listed in your package.json file as a development dependency only.
Now that ESLint is installed, you can initialize an ESLint configuration for your project using the following command:
./node_modules/.bin/eslint –init
An important piece in this command is the –init flag. The ./node_modules/.bin/eslint section of the command is the path to ESLint in your project. Using the –init flag activates ESLint for your project. Activating or initializing ESLint will create an ESLint configuration file that will allow you to customize how ESLint works with your project.
Before you can access your ESLint configuration file, you will be prompted with different questions about your project. These questions are asked to make sure that the configuration that is initialized for your project best fits your needs.
The first prompt will be:
? How would you like to use ESLint? …
To check syntax only
To check syntax and find problems
❯ To check syntax, find problems, and enforce code style
To check syntax only
To check syntax and find problems
❯ To check syntax, find problems, and enforce code style
Choose the To check syntax, find problems, and enforce code style option.
The next prompt will be:
What type of modules does your project use?…
JavaScript modules(import/export)
CommonJS(require/exports)
None of these.
JavaScript modules(import/export)
CommonJS(require/exports)
None of these.
Choose the CommonJS option to use CommonJS global variables.
The next prompt will say:
Which Framework does your project use?…
React
Vue.Js
None of these
React
Vue.Js
None of these
The next prompt will ask:
Choose the None of these option.
The next prompt will ask:
Does Your Project use TypeScript? No/Yes
Choose the No option.
The following prompt will say:
Where does your code run?…. (Press to select , to toggle all to invert selection)
Brower
Node
Brower
Node
Choose the Browser option.
The next prompt will say:
✔ How would you like to define a style for your project? …
❯ Use a popular style guide
Answer questions about your style
Inspect your JavaScript file(s)
❯ Use a popular style guide
Answer questions about your style
Inspect your JavaScript file(s)
Choose the Use a popular style guide option.
For the Which style guide do you want to follow? prompt, choose the Airbnb: https://github.com/airbnb/javascript option.
The next prompt will ask:
? What format do you want your config file to be in? …
JavaScript
YAML
❯ JSON
JavaScript
YAML
❯ JSON
Choose the JSON option.
You will then see this message:
Checking peerDependencies of eslint-config-airbnb-base@latest
The config that you’ve selected requires the following dependencies:
The config that you’ve selected requires the following dependencies:
eslint-config-airbnb-base@latest eslint@^5.16.0 || ^6.8.0 || ^7.2.0 eslint-plugin-import@^2.21.2
The last prompt will ask:
? Would you like to install them now with npm? › No / Yes
Choose the Yes option to install the dependencies with npm.
You will also be asked to install extra packages. Choose yes.
After completing all the prompts, you’ll notice that a file named .eslintrc.json has been added to your vscode-eslint-example directory. ESLint is now installed. The code in app.js hasn’t changed yet. This is because ESLint needs to be integrated with Visual Studio Code.
Step 3:
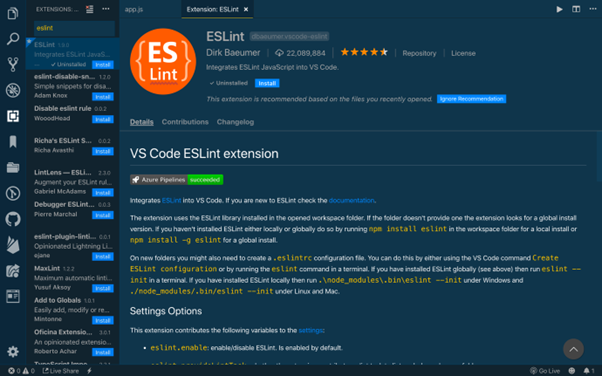
Installing the ESLint Extension
To integrate ESLint into Visual Studio Code, you will need to install the ESLint extension for Visual Studio Code. Navigate back to Visual Studio Code and search for ESLint in the Extensions tab. Click Install once you have located the extension:
Once ESLint is installed in Visual Studio Code, you’ll notice colorful underlining in your app.js file highlighting errors. These markers are color-coded based on severity. If you hover over your underlined code, you will see a message that explains the error to you. In this way, ESLint helps us find and remove code and syntax errors.
ESLint can do even more for you. ESLint can be modified to automatically fix errors every time a file is saved.
Step 4:
Customizing ESLint Rules
Open up the .eslintrc.json file. This is the code you will see in that file:
{
“env”: {
“browser”: true,
“commonjs”: true,
“es2021”: true
},
“extends”: [
“airbnb-base”
],
“parserOptions”: {
“ecmaVersion”: 12
},
“rules”: {
}
}
“env”: {
“browser”: true,
“commonjs”: true,
“es2021”: true
},
“extends”: [
“airbnb-base”
],
“parserOptions”: {
“ecmaVersion”: 12
},
“rules”: {
}
}
At the bottom of the .eslintrc.json file, you will see a “rules” object. To customize the errors that trigger ESLint or to disable ESLint’s response to certain pieces of code, you will add key-value pairs to the “rules” object. The key will match the name of the rule you want to add or change. The value will match the severity level of the issue. You have three choices for severity level:
- error – produces a red underline
- warn – will produce a yellow underline
- off – will not display anything.
If you do not want to produce any error messages for console.log statements, you can use the no-console rule name as the key. Input off as the value for no-console.
“rules” : {
“no-console”: “off”
}
“no-console”: “off”
}
You can read more on ESLint documentation.